How to Size a Solar Battery Bank
Last updated:
11 min read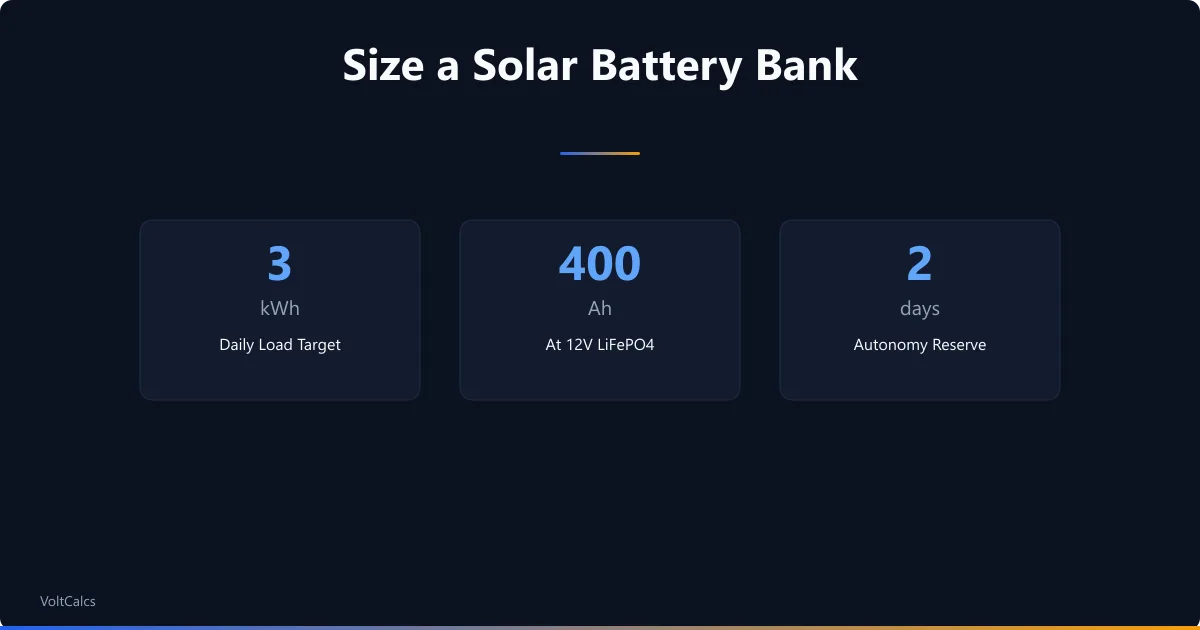
Sizing a solar battery bank comes down to four numbers: daily energy consumption, desired autonomy days, battery depth of discharge, and system voltage. Get these right and your system runs reliably for years. Get them wrong and you either overspend on batteries you do not need or — worse — run out of power on the second cloudy day.
This guide walks through the complete sizing process from load audit to final battery count. It works for any system: off-grid cabins, RV setups, van conversions, or grid-tied backup. If you want a quick answer, skip straight to the solar battery bank sizing calculator. To nail down your daily energy figure first, the off-grid load calculator walks you through a proper appliance audit. If you want to understand the math behind the result, read on.
Step 1: Audit Your Daily Energy Usage
The first number you need is your actual daily watt-hour usage. Not how many you think you use — how many you actually use.
List every device you plan to run on battery power. For each device, multiply its wattage by the hours per day you expect to use it. Add up the totals. Our electrical load calculator makes this inventory quick and systematic.
| Device | Watts | Hours/Day | Wh/Day |
|---|---|---|---|
| LED lights (5 bulbs) | 50 | 5 | 250 |
| 12V fridge | 45 avg | 24 | 1,080 |
| Laptop | 60 | 4 | 240 |
| Phone charger | 15 | 2 | 30 |
| Water pump | 60 | 0.5 | 30 |
| Fan | 25 | 6 | 150 |
| Total | 1,780 Wh/day | ||
Two critical adjustments to make after your initial tally:
Inverter losses. If you are running AC devices through an inverter, add 10-15% to those loads. A pure sine wave inverter is typically 85-90% efficient — meaning 100W of AC load actually draws 110-118W from the battery. DC-native devices (12V fridges, USB chargers, 12V LED lights) skip the inverter and avoid these losses entirely.
Seasonal variation. Your summer usage and winter usage may differ dramatically. A cabin that uses fans and a fridge in summer might switch to space heating and longer lighting hours in winter. Size for the season with the highest consumption unless you are willing to reduce loads during peak demand months.
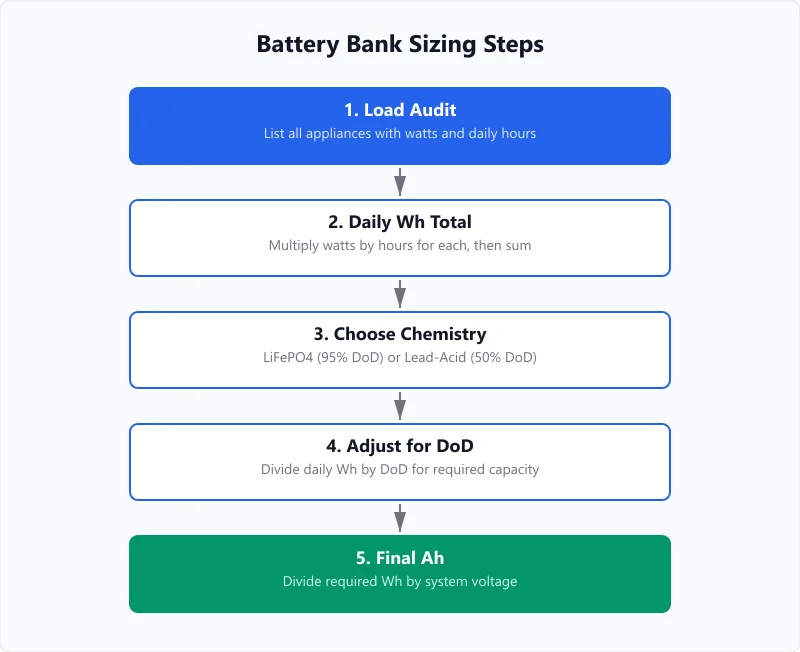
Step 2: Choose Your Battery Chemistry
Battery chemistry determines how much of your rated capacity you can actually use. This is the single biggest factor in bank size and cost.
| Chemistry | Safe DoD | Cycle Life at Rated DoD | Cost per 100Ah (as of early 2026) | Weight per 100Ah 12V |
|---|---|---|---|---|
| LiFePO4 | 80-100% | 2,000-5,000 | $250-450 | ~26 lbs |
| AGM | 50% | 300-500 | $150-250 | ~65 lbs |
| Flooded lead-acid | 50% | 300-800 | $100-180 | ~65 lbs |
| Gel | 50% | 500-800 | $180-300 | ~65 lbs |
LiFePO4 needs half the rated amp-hours to deliver the same usable energy as lead-acid, because you can safely discharge twice as deep. For the 1,780 Wh daily load above at 12V, you need roughly 185Ah of LiFePO4 (at 80% DoD) vs 370Ah of lead-acid (at 50% DoD). Use the Wh-to-Ah calculator to convert between units for your system voltage.
The LiFePO4 option is lighter, lasts 5-10x longer in cycles, and typically costs less over its lifetime despite the higher sticker price. For a detailed chemistry comparison, see our guide on LiFePO4 vs lead-acid runtime.
Step 3: Set Your Autonomy Days
Autonomy days = how many days your battery bank can power your loads without any solar recharging. This is your buffer for cloudy weather, snow coverage on panels, or system maintenance.
| Application | Recommended Autonomy | Why |
|---|---|---|
| Grid-tied backup | 0.5-1 day | Grid returns within hours; battery bridges short outages only |
| RV / van life | 1-2 days | You can relocate to sunlight or plug in at a campground |
| Weekend cabin | 2-3 days | Must cover a cloudy weekend without intervention |
| Off-grid home (sunny climate) | 2-3 days | Short cloudy stretches; generator backup available |
| Off-grid home (cloudy climate) | 4-5 days | Pacific Northwest, Northern Europe — multi-day cloud cover common |
| Critical loads (medical, comms) | 5-7 days | No tolerance for downtime; generator or grid as tertiary backup |
More autonomy days means more batteries, which means more cost and more weight. There is a point of diminishing returns: doubling your battery bank from 2 to 4 days of autonomy doubles the cost but only helps during the rare 3-4 day cloudy stretch. For most off-grid homes, 2-3 days of autonomy plus a propane generator for extended bad weather is the most cost-effective approach.
Step 4: Calculate the Bank Size
With your daily consumption, DoD, and autonomy days in hand, the formula is straightforward:
Bank capacity (Ah) = (Daily Wh × Autonomy days) / (Battery voltage × DoD)
Using our example: 1,780 Wh/day, 2 days autonomy, 12V system, LiFePO4 at 80% DoD:
(1,780 × 2) / (12 × 0.80) = 3,560 / 9.6 = 371 Ah
Round up to the nearest available battery size. Four 100Ah 12V LiFePO4 batteries in parallel gives you 400Ah — which provides a small margin above the calculated minimum.
The same calculation for lead-acid at 50% DoD:
(1,780 × 2) / (12 × 0.50) = 3,560 / 6.0 = 593 Ah
You would need six 100Ah lead-acid batteries to reach 600Ah — weighing roughly 390 lbs vs 104 lbs for the LiFePO4 option. Use the solar battery count calculator to run this math with your own numbers.
System voltage considerations
Higher system voltage means lower current for the same power, which allows thinner cables and reduces voltage drop over long cable runs.
- 12V: Best for small systems under 2,000W. Simple, compatible with most 12V appliances. Requires thick cables for high-power inverters.
- 24V: Good middle ground for 2,000-5,000W systems. Halves the current compared to 12V, reducing cable costs. Most charge controllers and inverters support 24V.
- 48V: Preferred for large systems above 5,000W. Standard for whole-house off-grid installs. Lowest current, most efficient, but fewer 48V-native appliances available.
To build a 24V bank from 12V batteries, wire two in series. For 48V, wire four in series. You can then parallel these series strings to increase capacity. Never mix batteries of different ages, brands, or capacities in the same bank — mismatched batteries create imbalance issues that reduce performance and lifespan of the entire bank.
Example: Sizing a Battery Bank for an Off-Grid Cabin
Sarah has a 3-season cabin in Colorado with no grid connection. Her daily loads total 2,400 Wh (fridge, lights, laptop, water pump, occasional microwave). She wants 3 days of autonomy because the cabin gets periodic multi-day cloud cover, and she has a small propane generator for extended bad weather.
She chooses LiFePO4 batteries at 80% DoD and a 24V system (to reduce cable costs for her 2,000W inverter).
Bank capacity: (2,400 × 3) / (24 × 0.80) = 7,200 / 19.2 = 375 Ah at 24V
She buys four 200Ah 12V LiFePO4 batteries and wires them as two parallel strings of two batteries in series (2S2P), giving her 400Ah at 24V. Total cost: approximately $1,800 as of early 2026. Total weight: roughly 200 lbs.
For solar panel sizing, Sarah needs enough panel capacity to fully recharge the bank on an average day. At 5 peak sun hours for Colorado (NREL data), she needs: 2,400 Wh / (5 hours × 0.80 system efficiency) = 600W of solar panels. She installs three 200W panels. Use our solar panel and battery sizing calculator to run a similar analysis for your location.
Common Battery Bank Sizing Mistakes
Sizing for rated capacity instead of usable capacity. A 200Ah lead-acid battery gives you 100Ah of usable energy at 50% DoD. If you sized for 200Ah, you will either damage the battery by over-discharging or run out of power at the 50% mark. Always calculate with usable capacity.
Ignoring inverter efficiency. Running AC loads through an inverter adds 10-15% overhead. A 1,000W daily AC load actually draws about 1,100-1,150W from the battery. This is the most commonly missed factor in DIY sizing calculations.
Undersizing for winter. Solar production drops 30-50% in winter months in temperate climates, as our solar panel output guide explains in detail. If your panels barely recharge the bank in summer, you will have a deficit in winter. Either oversize panels for winter production, reduce winter loads, or plan to run a generator during the shortest days.
Mixing old and new batteries. Adding new batteries to an aging bank does not add the full rated capacity. The old batteries limit the performance of the new ones. Charge current flows preferentially to the lowest-resistance cells, which means new batteries get overcharged while old batteries remain undercharged. Build a new bank and retire the old one entirely.
Forgetting about temperature. Lead-acid batteries lose roughly 1% of capacity for every degree Fahrenheit below 77°F. At 32°F, a 100Ah lead-acid battery effectively has about 70Ah of capacity. LiFePO4 batteries maintain capacity better in cold, but most LiFePO4 BMS systems prevent charging below 32°F to protect the cells — which means you cannot recharge from solar on a freezing morning until the battery warms up.
Example: Weekend RV Boondocking Setup
Marcus takes his RV to desert campsites most weekends from October through April. His loads: 12V fridge (45W average), LED lights (30W for 5 hours), phone and tablet charging (15W for 3 hours), water pump (60W for 15 minutes/day), and a 12V fan (25W for 8 hours in warmer months).
Daily consumption: 1,080 + 150 + 45 + 15 + 200 = 1,490 Wh. He rounds up to 1,500 Wh to account for small miscellaneous loads.
Marcus wants 2 days of autonomy (arrive Friday evening, depart Sunday afternoon — about 48 hours) with some buffer. He chooses 12V LiFePO4 at 80% DoD because his RV is already wired for 12V.
Bank capacity: (1,500 × 2) / (12 × 0.80) = 3,000 / 9.6 = 313 Ah
He installs two 200Ah 12V LiFePO4 batteries in parallel (400Ah total), giving him comfortable headroom. A single 200W solar panel on the roof provides supplemental charging during the day, extending his autonomy beyond the calculated 2 days.
For weekend use, Marcus could have chosen lead-acid to save money upfront. But his batteries cycle 40+ weekends per year. At 40 cycles per year, lead-acid batteries at 50% DoD would last 7-12 years. LiFePO4 at 80% DoD would last 50+ years at that rate — far outlasting the RV itself. The lifetime cost favors LiFePO4 for any system that cycles more than 20-30 times per year.
Check your own RV battery needs with the RV battery runtime calculator or calculate how many batteries your specific setup requires with the camper battery calculator.
Monitoring and Maintaining Your Battery Bank
A properly sized battery bank still needs monitoring. Without visibility into state of charge, voltage, and current flow, you are flying blind — guessing how much capacity remains instead of knowing. A battery monitor is the single most useful addition to any off-grid power system after the batteries themselves.
Battery monitors and shunt-based metering
A shunt-based battery monitor (like the Victron BMV-712 or Renogy 500A) installs on the negative battery cable and measures every amp flowing in and out of the bank. It tracks state of charge as a percentage, displays instantaneous power draw, records historical data like deepest discharge and cumulative energy throughput, and calculates estimated time remaining at the current load.
These monitors cost $80-150 and provide information that prevents both over-discharge (which damages batteries) and unnecessary generator starts (which waste fuel).
Voltage alone is an unreliable state-of-charge indicator. A LiFePO4 battery reads 13.1V at 90% SOC and 13.0V at 50% SOC — a difference too small to gauge accurately without a precision meter. Lead-acid voltage varies more with SOC but is heavily affected by load: a battery reading 12.0V under load might read 12.5V after resting for an hour. A coulomb-counting shunt monitor avoids this problem entirely by tracking actual energy flow.
Cell balancing
Batteries wired in parallel should share current equally, but slight differences in internal resistance between batteries cause imbalances. Over time, one battery may charge fully while another lags behind, reducing overall bank capacity. For lead-acid banks, equalization charging (a controlled overcharge at 15.0-15.5V) periodically rebalances the cells — most MPPT charge controllers have an equalization mode for this purpose.
LiFePO4 batteries handle balancing differently. Each battery has a BMS that balances its internal cells during the top-of-charge phase. For parallel LiFePO4 banks, make sure all batteries reach full charge regularly — at least once every 1-2 weeks. A battery that never reaches full charge never triggers its BMS balancing cycle, and cell drift accumulates over time.
If your solar system consistently falls short of fully charging the bank (common in winter or with undersized panels), run a generator or shore power connection periodically to bring all batteries to 100%.
Scheduled maintenance checks
Flooded lead-acid batteries need monthly water level checks — the electrolyte evaporates during charging and must be topped off with distilled water. AGM and LiFePO4 batteries are sealed and need no fluid maintenance, but all battery banks benefit from quarterly connection inspections.
Check terminal torque, look for corrosion on copper lugs (white or green deposits), and verify that cable insulation shows no signs of heat damage or chafe. Resistance at a corroded terminal wastes energy and generates heat that can cascade into more serious problems. A 10-minute inspection every three months prevents failures that take days to diagnose.
Frequently Asked Questions
Written and maintained by Dan Dadovic, Commercial Director at Ezoic Inc. & PhD Candidate in Information Sciences. He works professionally as Commercial Director at Ezoic Inc., leading revenue strategy across digital publishing.
Disclaimer: Calculator results are estimates based on theoretical formulas. Actual performance varies with temperature, battery age, load patterns, and equipment condition. For critical electrical work, consult a licensed electrician.
Editorial review by Doc. dr. sc. Damir Topić, Assistant Professor, FERIT Osijek.